Please note that this post contains affiliate links. Thanks for your ongoing support!

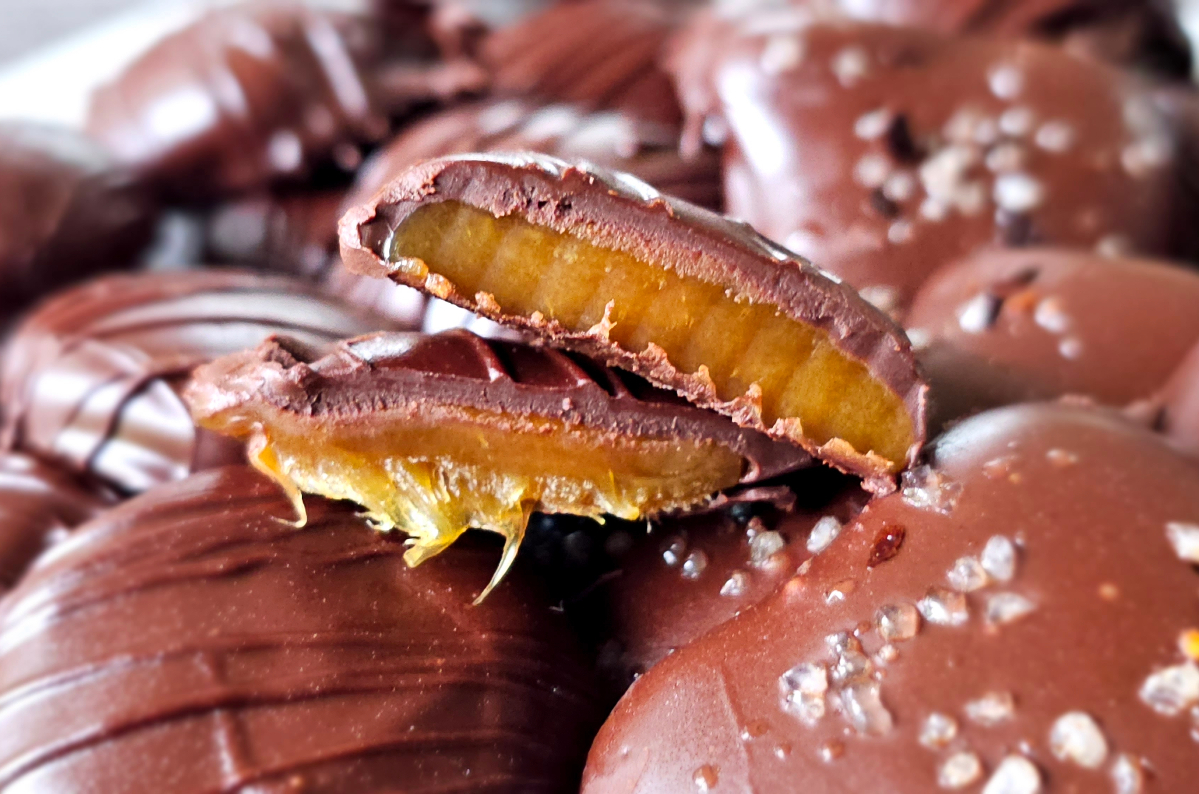
Homemade Chocolate Covered Caramels are rich, chewy, chocolately, incredibleness. Made with just a few ingredients, they’re a homemade, plant based, indulgence. You’d pay a ton in stores for these caramely gems, they’re that good! And….making them yourself? Priceless.
Homemade Chocolate Covered Caramels – Plant Based
There is nothing, nothing, like caramel. Nothing. It’s rich, creamy, indulgence that gives you a warm feeling all over. All that dopamine rushing through your system as you take a small bite of that amber goodness. I love caramel on just about anything, especially apples, but give me a good chocolate covered caramel and I’m in heaven. I’ve always wanted to make my own chocolate covered caramels and the Homemade Chocolate Covered Caramels are exactly what I’ve been craving!!

Homemade Chocolate Covered Caramels are the best. thing. ever!!!
Making Homemade Chocolate Covered Caramels
I’ve always wanted to make chocolate covered caramels or even chocolate covered turtles (you know…those pecan and caramel treats) but I never found a recipe I especially liked. While you could easily find reasonably priced dairy chocolate covered caramel treats, finding them dairy-free/plant based and gluten free is not so simple.I recently came across a recipe for Homemade Milk Duds by Sugarlaws.com and wondered if I might be able to adjust the recipe to make it dairy free. The recipe didn’t look too complicated, with only five ingredients (including water). I could manage that.

Homemade Milk Duds from Sugarlaws.com
Making Homemade Chocolate Covered Caramels
Most caramels consist of three basic ingredients: sugar, water and cream. The ratios of those ingredients as well as how long they’re cooked determines what type of caramel you’ll get.I recently posted the Caramel Apples – Dairy Free recipe, and that recipe called for more water and cream than the recipe for caramel candy does. I think that you could use the recipe for Homemade Chocolate Covered Caramels caramel on the apples as well, and they would turn out fabulously.
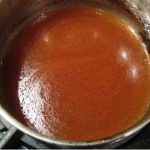
First melt the sugar and water together…
It’s super important that you start with a clean pot and make sure that small pieces of other ingredients don’t end up in the sugar. It will prevent the sugar from caramelizing properly.The first thing you do is melt the sugar and water together. When the sugar/water solution is clear it means that all the sugar is melted and it can start to cook. As the sugar solution cooks, it will change colors. You must watch the solution because once the sugar starts to brown it will cook very rapidly and the time between being that gorgeous amber color and a burnt smelly mess is very small.Trust me on this.

Cooking sugar for caramel – watch it…it can burn quickly once it changes color!
Then add the heavy cream…
This is the point where caramel can become dairy. For a more buttery caramel, most people use a dairy heavy whipping cream. It’s delicious.

Adding cream to the caramel is the point when the caramel decides if it’s going to be dairy or dairy-free.
But not dairy-free/pareve/plant based. I prefer to make my desserts dairy-free so they can be eaten after meat based Shabbat meals.
I ended up using Rich’s Whip dairy free heavy whipping cream instead of dairy cream. It’s important to make sure to whisk constantly to completely blend in the cream. If you don’t, it can separate when cooling and then you end up with a layer of fat with a caramelly liquid on the bottom.
It’s not pretty.
But when mixed properly, you get nothing but gorgeous caramel. It also helps to use a candy thermometer to monitor the temperature of the caramel.

Dairy Free Caramel poured into a parchment lined pan to cool. It’s clear and gorgeous.
Cutting the Homemade Caramel into squares…
Once the caramel has cooled at room temperature you can cut it into squares. I used a long chef’s knife that I sprayed with nonstick spray.

Homemade caramel cut into squares using a greased chef’s knife. You can also use a greased scissors.
The original recipe states that you can smush each square into a ball to make them more “Milk Dud like”. I did that for most but really, they turn out great even if you don’t.

Homemade Caramel smushed into a ball before covering with chocolate.
Dipping the Homemade Chocolate Covered Caramels into Chocolate
The original recipe calls for tempering chocolate before dipping. This gives the chocolate that beautiful shine and snap when you break/eat it. I wasn’t doing that. It’s a little more complicated to do and more effort than most people are willing to commit to. I find that adding a little shortening to chocolate chips, or using a baking bar chocolate works well.

Homemade Chocolate Covered Caramels. It took a little while to figure out the best way to dip them…
At first I pulled out my chocolate dipping tools, but they didn’t work as well as I would have hoped because the caramel was still fairly soft. I ended up using two offset spatulas, dipping with one and sliding the chocolate off with a second. That worked very well.
Decorating the Homemade Chocolate Covered Caramels
I had some awesome spicy salt that I had gotten a while back in Israel. I decided to make the square shaped chocolate covered caramels Spicy Hot Homemade Chocolate Covered Salted Caramel. Those got rave reviews.The other caramels I simply drizzled with the remaining chocolate for added decoration.

Homemade Chocolate Covered Caramels decorated with chocolate drizzle and spicy salt.
I then put them in the fridge for the chocolate to set.
And this is how they turned out:

OMG!!! OMG!!! OMG!!!
Here’s the recipe for Homemade Chocolate Covered Caramels – Plant Based
I made these incredible Homemade Chocolate Covered Caramels dairy fre, but you can always make them dairy if you choose. Additionally, you can simply dip the cut caramel squares rather than reshaping them. The reshaped ones will be smaller and thicker though.

Homemade Chocolate Covered Caramels – Plant Based
- Prep Time: 45 minutes
- Cooling Time: 240 minutes
- Cook Time: 30 minutes
- Total Time: 315 minutes
- Yield: 49 Homemade Chocolate Covered Caramels 1x
- Category: Dessert
- Method: Cooking
- Cuisine: Plant Based
- Diet: Kosher
Description
Homemade Chocolate Covered Caramels are rich, chewy, chocolately, incredibleness. Made with just a few ingredients, they’re a homemade, plant based, indulgence. You’d pay a ton in stores for these caramely gems, they’re that good! And….making them yourself? Priceless.
This recipe is based upon the recipe by sugarlaws.com: Homemade Milk Duds.
Ingredients
For the Caramels
- 4 ounces water
- 8 1/2 ounces sugar
- 3/4 teaspoon Diamond Crystal kosher salt
- 6 ounces heavy cream, dairy free
For the Chocolate Coating
- 12 ounces chocolate chips
- 1 tablespoon pure vegetable shortening
- Additional kosher salt for sprinkling (optional)
Instructions
For the Caramels
- Line an 8×8-inch square cake pan with parchment, with the excess coming up the sides of the pan.
- In a 2 to 3-quart sauce pan, whisk together the water, sugar and salt. Cook over medium heat, whisking constantly until the sugar is fully dissolved and the syrup begins to boil, about 4 minutes.
- Simmer, without stirring for around 7 minutes until the syrup begins to turn a golden amber.
- Immediately add the cream and whisk until smooth.
- Attach a candy thermometer to the pot, and cook, stirring constantly until the temperature registers 260°F.
- Immediately pour the caramel into the prepared pan and cover tightly with foil.
- Cool to room temperature, about 2 hours.
- Peel the caramel from the parchment and transfer to a cutting board.
- Cut into 49 pieces using a sharp, greased knife.
- Line a large baking sheet with parchment or a silicone mat. You can mold the caramel pieces into small, flattenend balls if desired and set them on the mat.
For the Chocolate Coating
- Place the chocolate and shortening in a large 8-cup microwave safe bowl/measuring cup. Microwave for a minute and a half.
- Whisk the chocolate until smooth.
To Finish
- Drop a caramel piece into the chocolate. Using a fork or offset spatula, completely cover the caramel with chocolate, then remove and scrape excess chocolate from the spatula against the side of the bowl/cup.
- Using a second spatula/knife, scrape the candy from the spatula onto the prepared baking sheet.
- Repeat with the remaining caramels.
- If using, sprinkle the candies with salt or drizzle with the remaining chocolate.
- Chill for at least 30 minutes to set the chocolate.
- Store in the refrigerator in single layers between parchment/wax paper sheets, in an airtight container.
Equipment

Fat Daddio’s Offset Spatula, 4 Inch
Buy Now →
Pyrex Prepware 8-cup Measuring Cup
Buy Now →Notes
To make these Kosher for Passover simply leave out the shortening.
Nutrition
- Serving Size: 1 Chocolate Covered Caramel
- Calories: 68
- Sugar: 9 g
- Sodium: 20.1 mg
- Fat: 3.5 g
- Saturated Fat: 2.1 g
- Carbohydrates: 9.5 g
- Fiber: 0.5 g
- Protein: 0.6 g
- Cholesterol: 3.9 mg
Here’s How I made Homemade Chocolate Covered Caramels on Instagram @koshereveryday
View this post on Instagram
More Craveable Caramel Recipes

CHECK OUT THE KOSHER EVERYDAY AMAZON INFLUENCER STOREFRONT!
I’m excited to announce the launch of my brand, spankin’ new, Amazon Influencer storefront. The purpose of this store is to share with you all of my favorite tools, ingredients and accessories that I use on Kosher Everyday. If there’s something you’d like to see please let me know and I’ll make sure to add it. I’m updating the storefront all the time. I’ve put together a complete Gluten Free Challah Storefront with everything you need to make fabulous Gluten Free Challah!
You can also find awesome Decorative Serving and Kitchen Items right here.
I’d love to hear what you think!
FOLLOW ME!
Don’t forget to follow Kosher Everyday on Instagram @koshereveryday! and on Facebook You don’t want to miss all the fun and interesting posts and reels that can be found nowhere else!You can find reels showing how to make most of my recipes on Instagram!Also, make sure to tag @koshereveryday when you make Kosher Everyday recipes! I LOVE to see your creations!!!Please note that this post contains affiliate links. Thanks for your ongoing support!
Can you add pecans to make a turtle? Thank you.
Sure Anne! I was thinking about doing just that!
You could also use cashews, almonds or hazelnuts as well
Thanks Rosalind! That’s a great suggestion! All the best, Sharon